5 Steps To the “No Makeup” Makeup Look
Just to make things clear, I am no professional makeup artist nor an expert. All things I do on my face every morning when I get to work I learned from my friends over here, from watching tons of makeup tutorials, and from committing mistakes. But somehow after constant practice, I’m getting by.
My favorite look is the “no makeup” look or nude or natural—whatever you call it. It’s super easy to do and it looks effortless, too—just perfect for your everyday look. Here are five easy steps to perfect this look. I also wrote down my favorite products in case you need to start your makeup kits.
But first, clean up. Clean your face, especially if you do this routine when you arrive at work. Dirt on your face will result in ugly pimples and who wants that?
Step 1. Even it out.
Apply baby powder on your face and neck. I don’t know why but I found that my face holds makeup better that way. Then you can apply primer and foundation. Here’s the thing: You really don’t have to apply them on your entire face. Makeup artist Lisa Eldridge shows and tells you why and how in the tutorial below. In a nutshell, you shouldn’t cover your healthy skin, just the problem areas.
My fave products: Makeup Forever’s High Definition Primer and The Body Shop’s Tea Tree Flawless BB Cream
Step 2. Conceal.
Know the proper concealer you should use on the different parts of your face. I use two–the liquid and the crayon types. I use the liquid concealer to hide the eyebags, while the crayon concealer for blemishes. Sometimes, like when the blemish is really ugly, I put on the crayon concealer and top it off with the liquid one for extra coverage. Make sure you get the right shade for your skin color because if it’s too light or too dark, you’ll just draw attention to the blemish. Settle everything by applying powder using a brush. I found out that when you’re using a sponge, the powder tends to cling on to it more than on your skin. The brush blends in everything just fine.
My fave products: The Body Shop’s Crayon Concealer and Revlon’s Age-Defying Liquid Concealer
Step 3. Brows.
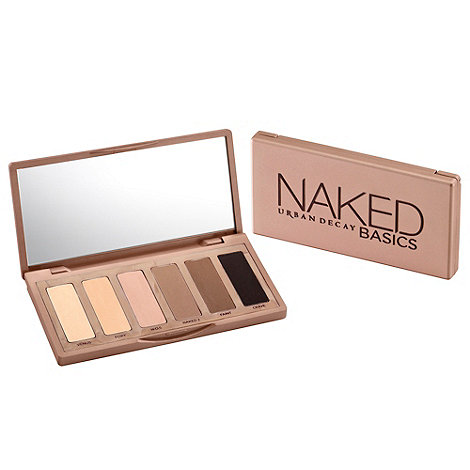
I just read this somewhere: thick brows are great because they make you look younger. Don’t know if it’s true, but I definitely like thick eyebrows. I love Lisa Eldridge’s (can you tell she’s my favorite? LOL!) eyebrow philosophy. I just use black eyeshadow (I love Urban Decay’s Crave shade from the Naked Basics) when I want to have bold-looking brows, but dark grey also works when I feel like going subtle.
My recommended products: Urban Decay’s Naked Basics, Make Up Godess’ Eyebrow Powder, Maybelline’s Shine-Free Foundation in Nude Beige
Step 4. Do the eyes.
First, apply eyeshadow. Go for neutral shades. Second, eyeliner. I use a brown more than the black one because it looks subtle. Put a light shade of glitter eyeshadow in the inner corners of your eyes to open them. And third, mascara. Curl your eyelashes first and then apply mascara. Apply what’s left of it on your lower lashes.
My fave products: Urban Decay’s Naked Basics, Make Up Store’s Marble Eyeshadow in Rosso Asiago, The Body Shop’s Eye Definer in Golden Brown
via Pinterest
Step 5. Don’t forget the lips.
You can go for a tinted lipbalm, a lipstick, or a lip gloss. Again, go for neutral shades.
My fave products: Happy Skin’s Moisturizing Lippie in Honeymoon Glow, Canmake’s Candy Wrap Lip in Navel Drop
Optional (for me because I think I don’t need blush most of the time, I think): Give your cheeks a little color. Make sure to apply one little strip on the apples of your cheeks—make sure the blush is an inch away from your nose. You can use peach or orange shades for a sun-kissed glow.
My fave product: Pixy’s Blush On in Passion Roses
My ultimate fave product needs a special mention, just because I love it so much. Urban Decay’s Naked Basics is a good investment. It has a matte finish (I try to veer away from shimmery eyeshadows as much as I can), and it’s pigmented and the color stays for hours even without using a primer. You can also give yourself a lot of looks with just 6 shades.
Remember that the first time you do this, it might take a bit long. But practice will make things easier, I promise. Don’t be scared to try different looks on your face because that’s how you get to study it and know the shades that work on it. Good luck!
More From Our Site
Ayessa is a total manang trapped in a 20-something’s body. She grew up in South Cotabato, studied college in Laguna, and moved to Metro Manila to follow her delusions of becoming a writer. When she’s not writing for Manillenials, Ayessa tries to update her blog and works as a profesh stalker for a teen magazine’s website.
